
Our homemade Giardiniera is incredibly good! This simple pickled vegetable relish, made with oregano, vinegar and olive oil, quickly becomes all the seasonings (it’s for me!).
You can thank Chef Richard for this incredible recipe. Walks the boundary between Italian and Chicago styles and offers the best world of both. You’ll find a classic mix of typical Italian-style crunchy vegetables and herbs along with olive oil, along with the heat of the touch that defines Chicago-style giardiniera.
I love this pickled vegetable relish and honestly, I struggle not to add it to my dinner plate every night. It’s crispy thanks to the vegetables. Thanks to oregano, thanks to vinegar, and thanks to oregano, there’s a complete punch. I’m obsessed. For more vegetable pickles, try carrots, dill pickles or these pickle beets!
Important ingredients
Vegetables: The crispy and colorful vegetable mixture makes this homemade Giardiniera very exciting. I use cauliflower, onion, sweet peppers (multicolored mini sweet peppers are my favorite!), carrots and celery. Garlic and Oregano: Fresh garlic is the way to go. Chop finely using 5 cloves. In this way, the salt water really takes on the garlic flavor. Dried oregano is also perfect for this. If you want to use something fresh, that’s fine either. Remember what you need more. The rule of thumb is to start with 2-3 times the amount of dried oregano called in the recipe and start to suit your taste. Salt and Sugar: We add a bit of salt and sugar to most pickles to add an inspired flavor. Salt makes the salty water seasonal, and sugar balances the vinegar’s stringy quality. Table salts contain iodine, so be sure to use sea salt or acid salt salt. Black and Red Pepper Flakes: Fresh ground black peppers give a better flavor to the Giardiniera flavor, while red chili pepper flakes add a hint of heat. It’s an option! You can use common crushed red chili flakes (like restaurants found at pizza restaurants) or try Gochugaru (Korean pepper flakes). I love them and use them on my homemade kimchi. They have some heat, but a bit sweet, so I use them instead of crushed red chili flakes in the dish. Pimento Stuffed Olives: These may be my favorite parts of Chef Richard’s Giardiniera. Just before transferring everything to the jar, slice them into rings and stir. Vinegar and olive oil: Reach out for high quality white wine vinegar for the best flavor. When it comes to oils, look for regular, more refined olive oil, not swelling. Since you refrigerate these pickles, using regular olive oil can help prevent them from curing significantly in the cold (but they can get a little hard). If you notice that the oil is solidifying when serving, let the jar sit at room temperature and return it to a liquid form a little.
How to make homemade giardiniera
I prefer to chop the vegetables to be rather small and taste better, so you will spend most of your time preparing them. For cauliflower (like my cauliflower chick salad), think about 1/4 inch portion for small “wood” and other vegetables. Chopping takes a little effort, but this recipe will be in stock for a while as it creates a large batch. Trust me, once your first jar is gone, you will be happy to go back to your cutting board and make another one!
It’s good right away, but the true magic happens in the fridge after a day or two. The vegetables marinate and the flavors blend to make them even better. The carrots and cauliflower are a little softer than ever before. They are still crispy, but not on the same level of crunch as raw. I can’t wait to give it a try!
Our favourite Giardiniera
Preparation
1 hour
Cook
5 minutes
total
1 hour 5 minutes
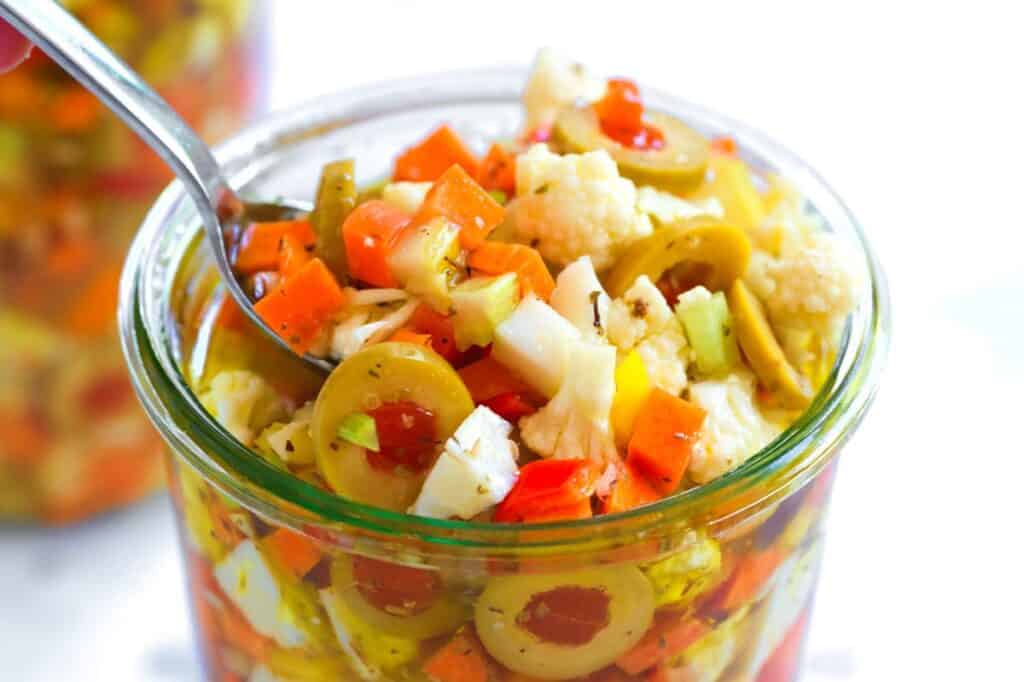
This version can be thought of as a fusion of Italian and Chicago-style Giardiniera. We call it Italian on our lovely list of crispy vegetables, vinegar, herbs and Chicago styles. The homemade Giardiniera lasts around three weeks in the fridge, adding a crispy, enthusiastic bite to almost anything (particularly I love it on burgers, pizzas and anti-past boards with sliced homemade focaccia).
1 2 quart jar, 32 servings
You will need it
1½ pounds (680g) of cauliflower, 1 to medium cauliflower, about 4 cups of small flowers
Half of the big carved onion
5 pieces of garlic, mining
8 oz (226g) sweet peppers, seeds removed and chopped, about 2 cups
3 ribs of celery, about 1 cup chopped celery
Medium carrots, about 2 cups of chopped carrots
1 tablespoon of dried oregano
1 tablespoon fine sea salt or acid salt
1 tablespoon granulated sugar
1/2 tsp fresh ground black pepper
1/2 tsp crushed red chili flakes, optional
20 green pimente stuffed olive sliced in rings
2½ cup (20 oz or 590 ml) white wine vinegar
1½ cup (12 oz or 354 ml) olive oil, not extra virgin, see note
direction
1Preparing equipment: Prepare a large mixing bowl and a 2-quart canned jar (or two 1-quart jars).
2Prepare the vegetables: Remove the stems and leaves from the cauliflower and cut them out or pull them into small small flowers (about 1/4 inch). Chop the garlic and cut the remaining vegetables (onions, sweet peppers, celery, carrots) into 1/4 inch or less fragments.
3Mix the vegetables: In a large mixing bowl, mix the prepared cauliflower, onion, garlic, sweet pepper, celery, carrots, oregano, salt, sugar, black pepper and pepper flakes (if used). Mix and let it sit on the counter for 30 minutes.
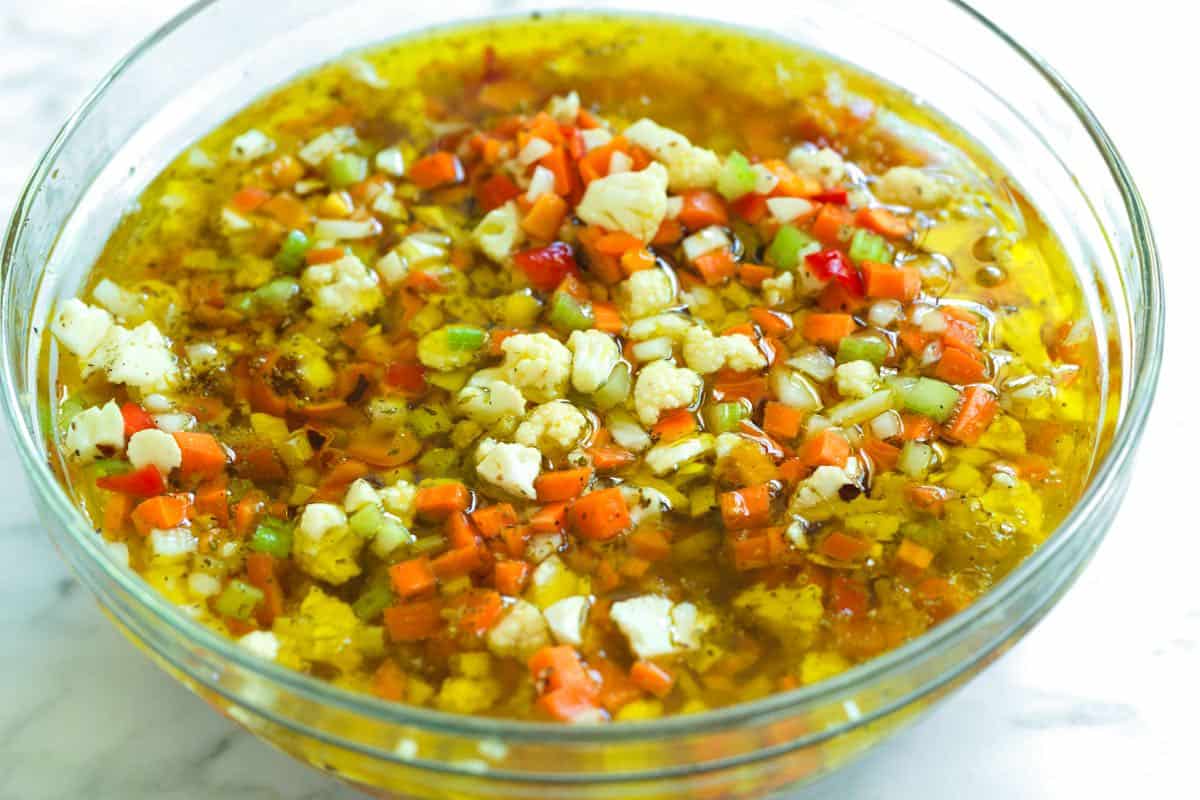
4Make salted water: Mix white wine vinegar and olive oil in a pan. The mixture is simmered over medium heat.
5Add salted water to the vegetables. Carefully pour hot vinegar and salted oil into the vegetable mixture. Using a spoon, press down on all the vegetables and sink into the salt water. Wrap the top of the bowl in plastic wrap so that everything can be completely cooled to room temperature.
6Add the olives and transfer to a jar. Once cool, mix in the sliced green olives. Transfer the entire mixture to a 2-quart jar (or two 1-quart jars).
7Store in the fridge: Refrigerate overnight (preferably upside down, in a bowl, covering evenly). The next day, raise the jar to the right and stand up another day in the fridge. They will only get better from here! You’re sitting, make sure the salted water covers the vegetables. It lasts for about 3 weeks in the fridge.
Adam and Joan tips
Notes on Olive Oil: We recommend using very refined olive oil rather than super virgin for this recipe. Extra virgin olive oil tends to solidify more quickly and completely at cold temperatures in the fridge, making it difficult to supply directly from the fridge. If you notice that the oil is solidifying while it is being fed, don’t worry. Remove the dialdiniella at room temperature for a short period of time until the oil liquefies again. Storage: Store your homemade Giardiniera in the fridge for up to 3 weeks, ensuring that the vegetables are completely submerged in salt water. If necessary, you can refill the jar with vinegar and oil to keep everything covered (starting with 2 tablespoons of vinegar + 1 tablespoon of olive oil). How to serve it: Homemade Giardiniera is so good that you eat it straight out of the jar, but it is incredibly versatile and can add a wonderful, tangy bite to almost anything. It is a classic with Italian beef and roast beef sandwiches. I love Muffletta Sandwiches and it’s perfect for appetizers and antipasto boards. Try it with your homemade burgers, turkey burgers, beer brats, meatloafs and hot dogs. I also like it as an alternative to pickled tuna salad, chick pia salad and chicken salad! And finally, we like it on pizza (try my homemade pizza dough or cheese pizza). Nutrition facts shown below are estimates. Since it is difficult to calculate the amount of salt in a vegetable, I included all the salt water in the calculations.
Nutrition per meal
Serving size
Approximately 1/4 cup (vegetables and salted water)
/
calorie
111
/
Total fat
10.9g
/
Saturated fat
1.6g
/
cholesterol
0mg
/
sodium
260.5mg
/
carbohydrates
3.4g
/
Dietary fiber
1g
/
Total sugar
1.7g
/
protein
0.7g
author:

We are Adam and Joan, who have been passionate about cooking and sharing trustworthy recipes since 2009. Our goal? To encourage you to enter the kitchen and cook fresh, flavorful meals with confidence.